How to install Audacity on your Chromebook

This article is at least a year old
Chromebooks are decent, capable machines, used in many places especially the education market: but they’re a little let down when it comes to audio editing software.
Fear not, though: it’s really easy to install Audacity onto your Chromebook and get some great audio editing software that will let you do almost everything you need to.
Three steps to install Audacity on ChromeOS
Turn on Linux support on your Chromebook. Most recent Chromebooks have this. Click the clock in your taskbar, the Settings cog, then search for “Linux” and enable it. This’ll take five minutes or so, so have a nice cup of tea.
You’ll now have a Terminal console blinking at you in all its green scariness. It also appears in “Linux apps” in your launcher if you want it again. Type:
sudo apt-get install audacityto install the program. ('sudo’ means 'do this as a super user’; 'apt-get’ is the advanced packaging tool that Linux users use to install programs).
It’ll ask you if you want to install lots of things. Type “Y” (a capital y) to agree, and hit enter.
Your screen will fill with exciting nonsense like
Preparing to unpack .../27-notification-daemon_3.20.0-4_arm64.deb ...
Unpacking notification-daemon (3.20.0-4) ...
Setting up libgme0:arm64 (0.6.2-1) ...
Don’t panic, your machine isn’t leaving you. This is Linux installing a set of programs and libraries. After a while, it’ll stop.
(This installs v2.2.2 of Audacity, not the latest one. There’s not much you can do about that.)
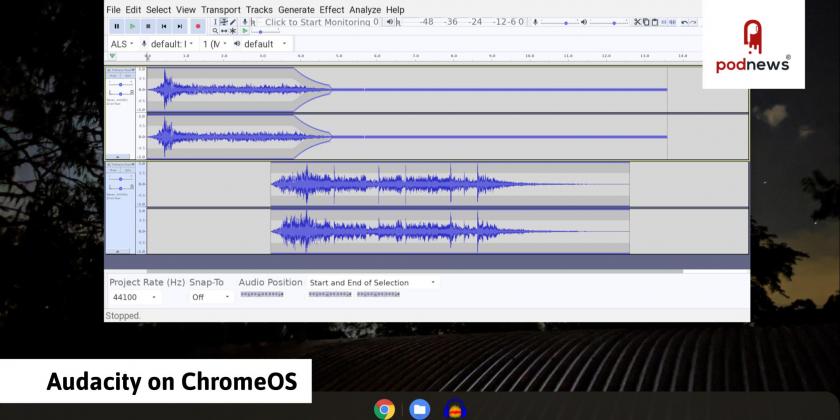
You should now have an Audacity icon in your launcher (in the “Linux apps” group). Go on, try clicking it and see if it works. If your machine has a high-density screen, some of the buttons might be really quite small and difficult to read, but it works.
Using Audacity on your Chromebook
Linux on a Chromebook is a bit like a “machine inside another machine”, so in order for it to see your audio files, you’ll need to use the Files app on your Chromebook and pull an audio file into the new “Linux Files” folder in “My files” so that the Linux machine inside your Chromebook can see it. Once you’ve loaded it, try playing it - there’s an output volume in Audacity itself, which you might need to use.
You can load audio files, edit like you normally would, and export files from Audacity too - and it exports MP3 without having to fiddle with any additional files, too.
When you export files, they’ll again go into the “Linux files” area of your Chromebook. In the Files app, you can pull them out of there and do whatever else you want to do with them.
Enabling recording
You can edit, play back, and export perfectly happily on Audacity. There’s one more thing to do, to enable recording.
Go back to your Chromebook’s settings, and search for “Linux”. Now you’ve turned it on, there’s a little toggle switch in there to turn on microphone support:
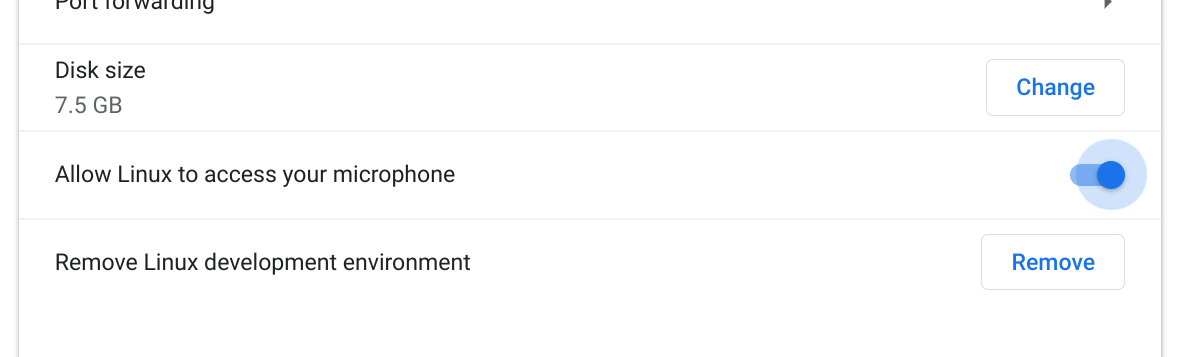
Make sure this is turned on, and your Chromebook will have access to your microphone - both the one built-into your device, but also USB microphones and other devices.
You might find it’s a little slow: that’s probably due to the slow processor in your Chromebook. You might also find that an Android app might do a better job; but this appears to work well enough.
Good editing!
| James Cridland is the Editor of Podnews, a keynote speaker and consultant. He wrote his first podcast RSS feed in January 2005; and also launched the first live radio streaming app for mobile phones in the same year. He's worked in the audio industry since 1989. |